Monday, February 28, 2011

Drop Down List In Blogger


Drop Down list is a user interface control GUI element, which allows the user to choose one value from a list. When a drop-down list is inactive, it displays a single value. When activated, it displays (drops down) a list of values, from which the user may select one. When the user selects a new value, the control reverts to its inactive state, displaying the selected value.

Here is the demo of it :


Its easy to make this drop down list.Just go to  > Layout >Add Gadget >HTML/JavaScript  and add the below code and save it.
<form><select name="menu" onchange="window.open(this.options[this.selectedIndex].value,'_blank')"
size=1 name=menu>

<option>- Your Title - </option>

<!-- change the links with your own -->

<option value="http://Link 1">List Item 1</option>

<option value="http://Link 2">List Item 2</option>

<option value="http://Link 3">List Item 3</option>

<option value="http://bloggerflick.blogspot.com">Free Widgets</option>

</select></form>
Change the text in red and add your links, change text in blue and add link titles.


(taken from :http://bloggerflick.blogspot.com/2009/12/how-to-add-drop-down-list-in-blogger.html)
Thursday, February 24, 2011

ICT storage devices


Nowadays, we usually need some external data storage devices like thumbdrive or harddisks.
Its very common to have them.

But, is the data we stored in those devices safe? Practically, the answer is 'no'.

So, here I suggest an alternative way to save our data safe.

Thumbdrive

-We can use, our Google account to create an on-line 'thumbdrive', which is about 100 MB in size each. We can create and use more than one 'thumbdrive' for each Google account. Here, the Google Sites, function as an on-line 'thumbdrive'.


Harddisk
We may need a bigger storage device to keep a number of files together. For this, we can use 'CLOUD PC' account which allows us to keep 1 GB data. Each Google account allows us to create a 'CLOUD PC' on-line.

By using those on-line storage 'devices' there is no worry about virus attack or file lost. So, why waste money by buying a thumbdrive or an external harddisk?


Monday, February 14, 2011

Hide Icon Text

Some icons on our desktop are very familiar to us, such as 'my computer','my documents', ect.

We can just keep the icons there without the text.

To do this, just right click the icon and rename as [Alt+]255. For the second icon, rename as [Alt+]255 [Alt+]255. For the following one, just repeat [Alt+]255.


taken from :  http://www.howtogeek.com/howto/windows-vista/hide-desktop-icon-text-on-windows-vista/

Saturday, February 12, 2011

Microsoft Groove_How to stop pop up?


START BUTTON> RUN> "type" MSCONFIG > go to start up tab > uncheck groove related entries

taken from : http://answers.yahoo.com/question/index?qid=20100217090755AA1uvVn

Yahoo Messenger_How to stop the pop up?


START BUTTON> RUN> "type" MSCONFIG > go to start up tab > uncheck yahoo messenger.

taken from : http://answers.yahoo.com/question/index?qid=20100217090755AA1uvVn

Windows 7_ RUN button missing?

Windows 7 users cannot see RUN button as default. To view the button do as follows.

METHOD ONE

Through the Start Menu
1. Open the Start Menu.

2. Right Click on a empty space on the Start Menu and select Properties.

3. Click on the Start Menu Tab and click on Customize.

4. Tick the Run Command and OK.


METHOD TWO

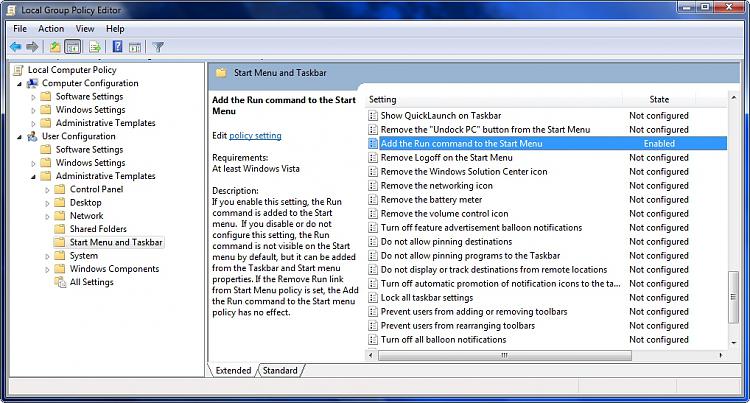
Through the Local Group Policy Editor
1. Open the Start Menu.

2. In the white line (Start Search) area, type gpedit.msc and press Enter.

3. Click on Continue in the UAC prompt.

4. In the left pane, click on User Configuration, Administrative Templates and Start Menu and Taskbar. (See screenshot below)


5. In the right pane, right click on Add the Run command to the Start Menu and click on Edit.
Start Menu - Add Run Button-2008-11-18_003759.jpg


taken from : http://www.sevenforums.com/tutorials/559-start-menu-add-run-button.html

Friday, February 4, 2011

Add Slideshow onto your blog


If you want to add a slideshow onto your blog, first create an account in Flicker, Photobucket or ect. where you need to store your photos.

Here are the steps to create a slideshow onto your blog by using Flicker as photo source.
  1. Head to Flickr and sign up for an free account
  2. Make a new album and upload all your images
  3. Add description and tags to your images and click on Create a new set
  4. Give a proper name to your set and save the settings
  5. Click on Share this >> Grab the link and copy the slideshow code
  6. Go to Blogger dashboard and head to Layout >> Page Elements >> Add a Gadget >> Slideshow
  7. Give a title and choose Source and Option as Flickr and User respectively
  8. Paste the Slideshow code that you copied from Flickr
  9. Click on Save to save the changes you have made
  10. You are done.
Now you can see your Slideshow for Blogger blogs on your blog. You can later add or remove images from your Flickr account and edit your album accordingly so that it displays selected images accordingly.

(taken from :- http://www.solidblogger.com/create-display-photo-slideshow-on-blogger/)

Wednesday, February 2, 2011

Sticky Notes (Windows 7 desktop)

Using Sticky Notes

You can use Sticky Notes to write a to-do list, jot down a phone number, or do anything else that you'd use a pad of paper for. You can use Sticky Notes with a tablet pen or a standard keyboard. To write a note using a tablet pen, simply start writing on the note where you want the ink to appear. To type a note, click where you want the text to appear, and then start typing.
Picture of a sticky noteSticky note
Hide all

  • Open Sticky Notes by tapping the Start button Picture of the Start button. In the search box, type Sticky Notes, and then tap Sticky Notes in the list of results.
    To create additional notes, click the New Note button.
    You can also open a new note by pressing Ctrl+N.
Tip

Tip

To resize a note, drag an edge or corner of the note to make it larger or smaller.

When you've finished using a note, you can delete it to clean up your desktop.
  1. Click the Delete Note button.
  2. In the Sticky Notes dialog box, click Yes.
    You can also delete a note by pressing Ctrl+D.
Note

Note

Sticky Notes closes if you delete all of your notes. To create a new note, reopen Sticky Notes.
  • Open Sticky Notes by tapping the Start button Picture of the Start button. In the search box, type Sticky Notes, and then tap Sticky Notes in the list of results.

  • Right-click the note that you want to change, and then click a color.

You can format text, add bullets to make a list, or change the text size by using keyboard shortcuts. Here's how:
  1. Select the text that you want to change.
  2. Use the following keyboard shortcuts to format the text on your note:
    Type of formatting
    Keyboard shortcut
    Bold text
    Ctrl+B
    Italic text
    Ctrl+I
    Underlined text
    Ctrl+U
    Strikethrough
    Ctrl+T
    Bulleted list
    Ctrl+Shift+L
    (Press this keyboard shortcut again to switch to a numbered list.)
    Increased text size
    Ctrl+Shift+


    Decreased text size
    Ctrl+Shift+<


    taken from :
    http://windows.microsoft.com/en-US/windows7/Using-Sticky-Notes